


")


“I am so terrified after I saw attempting data recovery after the update message on my iPhone. I’ll lose all my photos, contacts, and messages. Please tell me how to fix it.”
If you have ever updated your iPhone to the latest iOS version, you may have encountered a scary message on your screen: “Attempting data recovery.” This message means that your iPhone is trying to restore your data from a backup after the update, but it may also mean that something went wrong during the process.
Many users have reported that their iPhones got stuck on this message for hours, or even worse, that they lost some or all of their data after the update. If you are one of them, don’t panic. In this article, we will show you how to fix attempting data recovery iPhone issue and recover your data safely and easily.
Why is my iPhone Attempting Data Recovery After Update?
If your iPhone attempting data recovery, you’re not alone! There are many users that face the attempting data recovery iPhone issue. Here are some of the possible reasons that you may have this issue:
- Your iPhone had a low battery level or was disconnected from the power source during the update process.
- Insufficient storage
- Incompatible hardware or software components that interfered with the update.
- Network issue
How to Get Out of Attempting Data Recovery on iPhone?
Want to know how to get out of iPhone 14 attempting data recovery? Here are some methods:
Force Restart Your iPhone
Force restart refreshes the iPhone and often fixes stuck issues. Here are the steps for iPhone 8 and earlier and iPhone X and later:
1. For iPhone 8 and Earlier
Press and hold the Volume Down button and the Sleep/Wake button at the same time until you see the Apple logo on the screen.
2. For iPhone X and Later
Press and quickly release the Volume Up and Down button, one-by-one. Proceed with pressing and holding the Side button until Apple logo shows up on the screen.
This may help you get rid iPhone stuck on black loading screen and other update-related issues.
Solving iPhone Stuck Issue with Passvers iOS System Recovery
iPhone stuck in Apple Logo or other mode is actually a very common issue, and there’s no need to worry too much when you encounter it. You can quickly solve this problem by using some auxiliary methods, such as using Passvers iOS System Recovery. When it comes to fixing iPhone issues like the Apple logo stuck on iPhone, Passvers iOS System Recovery is the reliable and comprehensive solution you can rely on, unlike iTunes which treats iPhone restoration as an additional feature.
Let’s take a closer look at its highlights:
- Intuitive interfaces and keypads for easy usage.
- Compatible with iPhone 15/14/13/12/11/10/8/6/XR/X/XS and older models.
- Offers a non-jailbreak solution to restore a stuck iPhone to its normal state.
- Replaces iTunes for iPhone restoration and easy iOS downgrades.
- Factory reset locked iPhones without passcode or Apple ID.
- Supports 50+ iOS issues, including Apple logo or black screen stuck.
So, how can you use Passvers iOS System Recovery to fix issues like iPhone being stuck on the Apple logo, recovery mode, or any other screen? Let’s take a look at the detailed step-by-step guide.
Step 1. Download and install Passvers iOS System Recovery on your computer. Once the download is complete, launch the software.
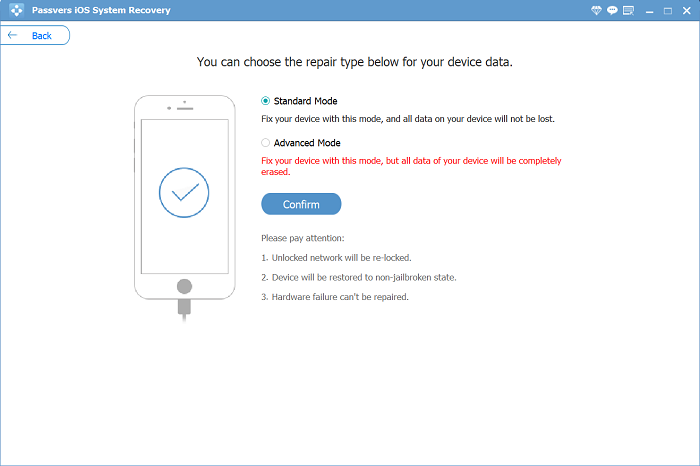
Step 2. Connect your iPhone, which is experiencing the stuck issue, to your computer using a data cable. Then, follow the software instructions to select the appropriate repair mode (Free Quick Fix, Standard Mode, or Advanced Mode).
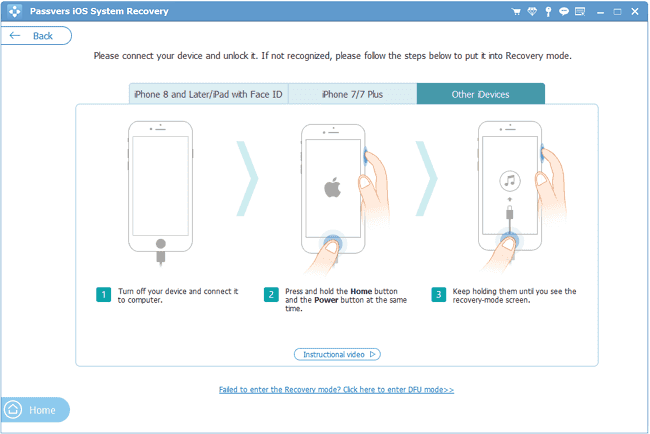
Step 3. Next, the program will provide instructions on how to put your iPhone into Recovery Mode. Even if you are unsure about how to enter the modes, the program will guide you step by step. Simply follow the instructions to enter Recovery Mode.
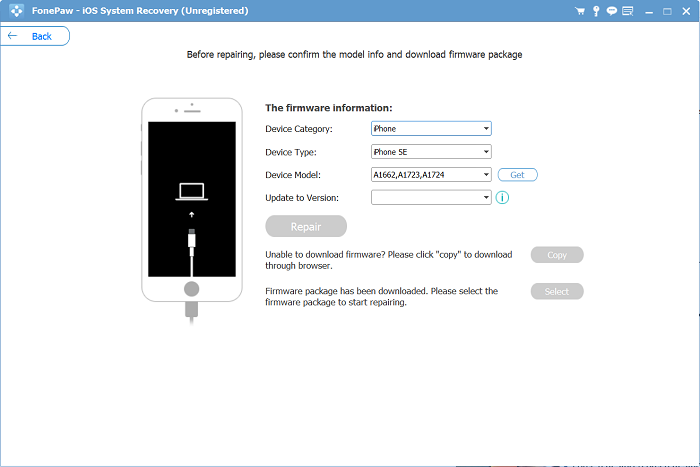
Step 4. Passvers iOS System Recovery will automatically prepare the firmware package for your device. Verify the displayed info matches your iPhone, then download the firmware to proceed past the Apple logo screen.
Step 5. The program will download and install the firmware to fix your iPhone. Just wait for the progress bar to reach 100%. Once done, your iPhone will reboot and the stuck issue will be resolved.
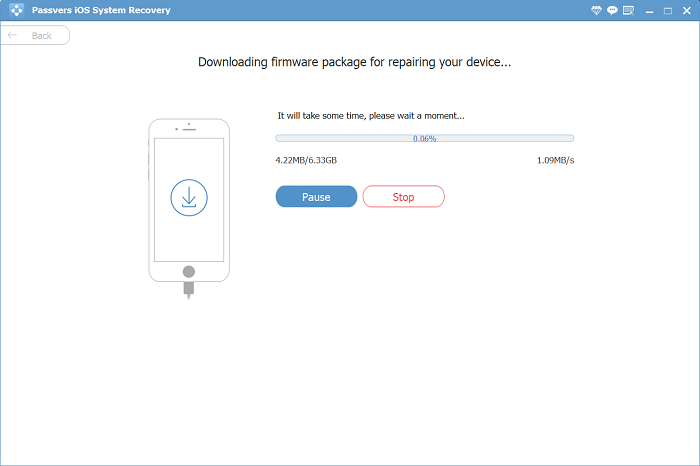
Please ensure that you keep your network connection stable and uninterrupted and refrain from moving or using your iPhone while waiting. Just hang tight for a moment, and your iPhone will be back to normal in no time.
Use FonePaw iPhone Data Recovery to Retrieve Lost Data Efficiently
FonePaw iPhone Data Recovery is an excellent iOS data recovery tool that can help you recover deleted/lost data and files from your iPhone without backup. With its extensive compatibility, you can recover 30+ types of files, including photos, videos, contacts, messages, chats & attachments in WhatsApp, etc. on almost all iPhone models, even the new iPhone 15 running iOS 17. What’s more, FonePaw offers FOREVER FREE scanning and preview, ensuring you can check your deleted files before recovery, adding to its appeal.
Follow the steps below to recover lost iPhone data with FonePaw iPhone Data Recovery:
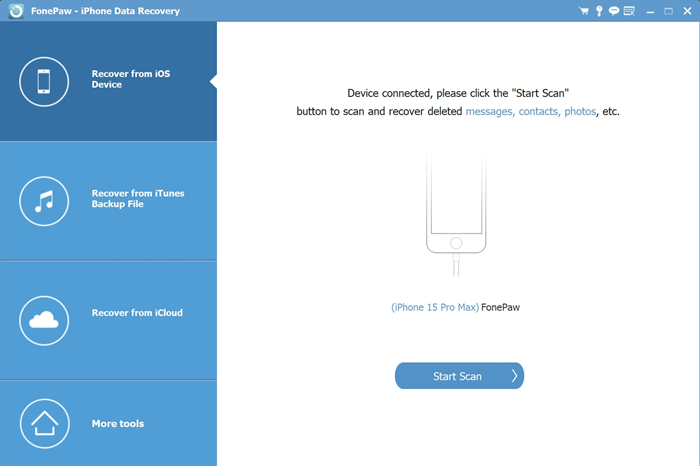
- Download, install, and launch FonePaw iPhone Data Recovery.
- Connect your iPhone to computer with a USB cable.
- Choose “Recover from iOS Device” in FonePaw, and click “Start Scan”.
- Wait for one or two minutes, then preview the deleted files and tick what you want to recover.
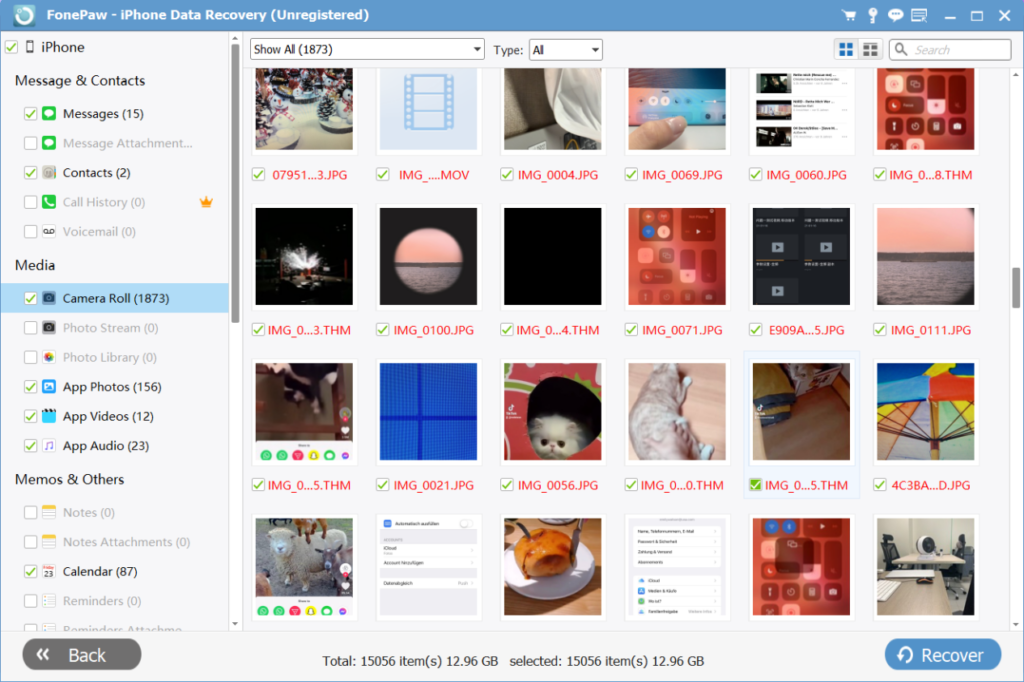
- Click “Recover”, set the output folder, and recover the lost files onto your computer.

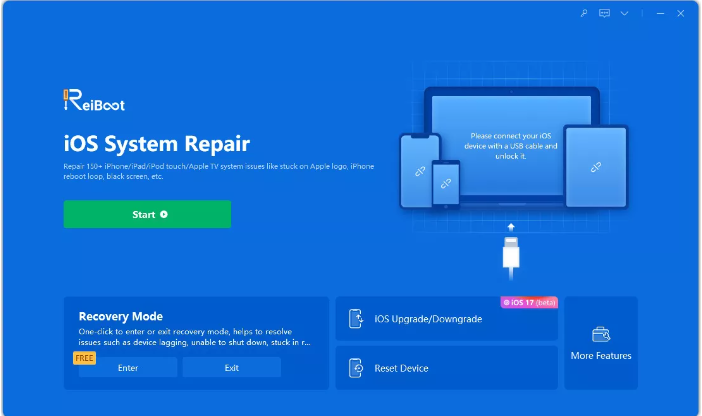
Use Tenorshare ReiBoot to Get Out of the Stuck Issue
If your iPhone is stuck on Apple logo, recovery mode, or any other screen, you can also use Tenorshare ReiBoot to get out of the stuck issue. Tenorshare ReiBoot- iOS system repair is an iOS system recovery software that can help you fix various iOS problems without losing any data. Here are some of the features of Tenorshare Reiboot:
- Easily enter and exit iPhone recovery mode with a single click.
- Recovery mode enables restoring your iPhone from iTunes or Finder.
- Resolves stuck iPhone issues like the cable-computer icon screen.
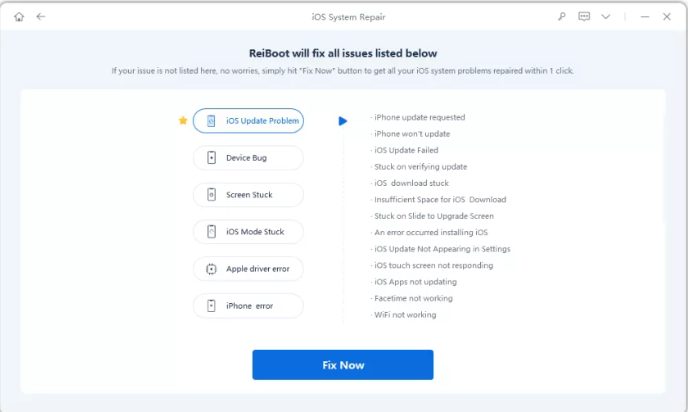
- Repairs over 150 iOS system problems, including Apple logo, black/white screen, boot loop, update and restore failures, etc.
- Offers two repair modes: Standard Repair (no data loss) and Deep Repair (erases data for serious issues).
- Facilitates iOS version updates/downgrades without using iTunes or Finder
Now that you know about the versatile and robust tool here’s how to use it to solve the attempting data recovery iPhone issue:
Step 1: Get Tenorshare ReiBoot from official website.
Step 2: Launch ReiBoot and establish connection between your iPhone and computer using a USB cable.
Step 3: If your iPhone is stuck on black loading screen, you can click on the Start Repair button to enter the repair mode.
Step 4: In the repair mode, you can choose either Standard Repair. Then, download the firmware package for your device by clicking on the Download button.
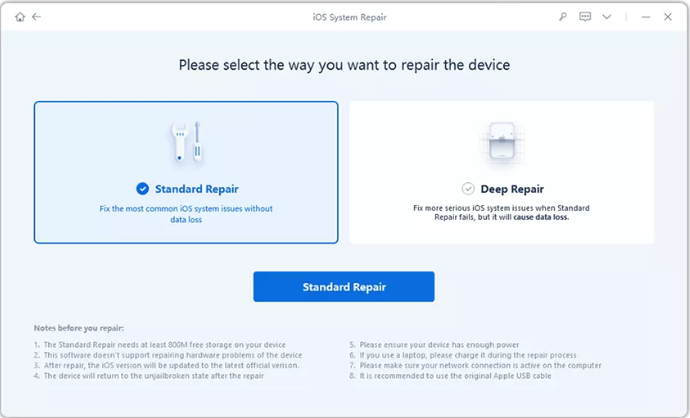
Step 5: After downloading the firmware package, you can click on the Repair Now button to start repairing your iPhone.
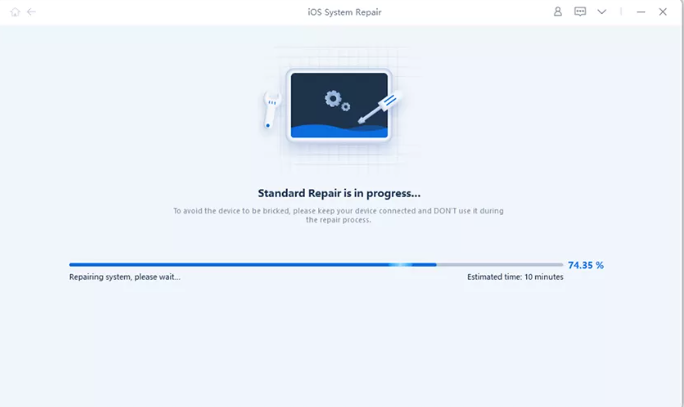
When the repair is completed, your iPhone will restart automatically and exit the stuck issue. You can then check if your device is working normally.
For visual guide, please refer to this video:
Put your iPhone into Recovery Mode
Here’s how to put your iPhone in recovery mode for different iPhone models:
1. Phone 8 and Later:
Connect to computer and launch Finder (Catalina/Big Sur) or iTunes. Press Volume Up, Volume Down, and hold Side. Release at lightning cable screen.
2. iPhone 7 and 7 Plus:
Connect your device to computer and open Finder (Catalina/Big Sur) or iTunes. Hold Sleep/Wake and Volume Down and release at recovery mode screen.
3. iPhone 6s and Earlier:
Establish connection between your iPhone and computer using Finder (Catalina/Big Sur) or iTunes. Hold Sleep/Wake and Home and release at recovery mode screen.
Update your iOS Version
Updating your iOS version can help you enjoy the latest features, security updates, and get rid of attempting data recovery iPhone. Here’s how to do it:
- Connect iPhone to a computer with USB cable.
- Open iTunes or Finder on your PC.
- Select your device from the sidebar.
- Click “Check for Update.”
- Follow the on-screen instructions to download and install the update.
- Enter the passcode and agree to the terms if prompted.
These methods can surely help you get rid of why is my iPhone attempting data recovery after the update. Also, the most reliable and high success rate method is by using Tenorshare Reiboot; we highly recommend it!
How to Recover Data after Attempting Data Recovery Failed
There are many audiences that are unable to undo the attempt as they didn’t realize what that message means! Fret not; here’s how you can recover the data after your iPhone attempted data recovery failure:
Common Methods
Common methods include restore iPhone data with iCloud or iTunes. But these fixes are feasible only if you have created a backup on any of these platforms. If you don’t have one, this method can’t be of any help.
1. Recover iPhone Data via iCloud Backup
Here’s how to recover data using iCloud Backup:
- Start iPhone setup and reach Apps & Data screen.
- Select “Restore from iCloud Backup” and sign in.
- Choose backup from list and wait for transfer.
- Sign in to restore apps/purchases or skip.
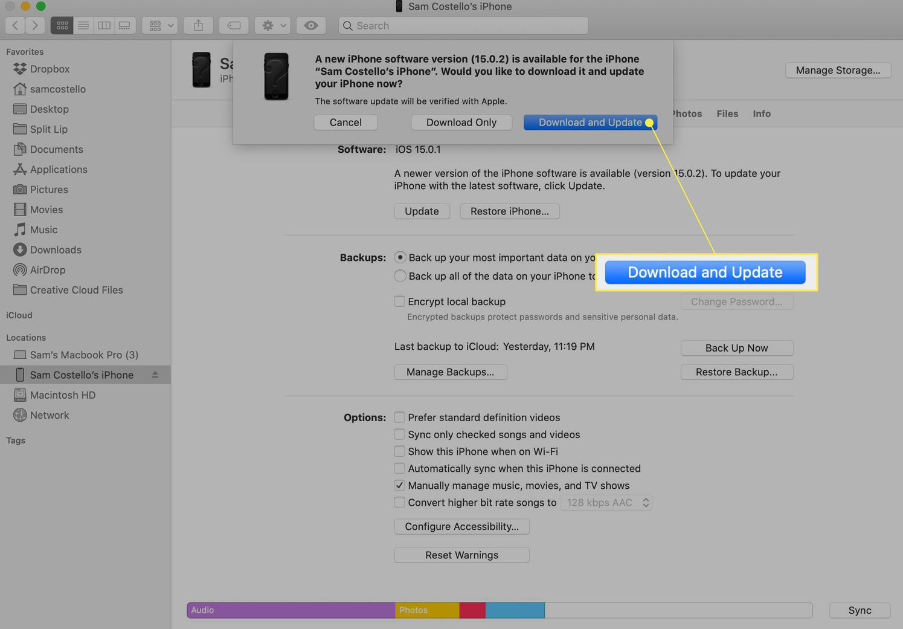
2. Recover iPhone Data via iTunes Backup
Here’s how to recover data using iCloud Backup:
- Connect iPhone to computer via USB cable, open iTunes.
- Select iPhone from device icon in iTunes.
- Click “Restore Backup” and choose desired backup.
- Confirm password/terms, click “Restore.”
- Wait for restore to finish, iPhone restarts and syncs.
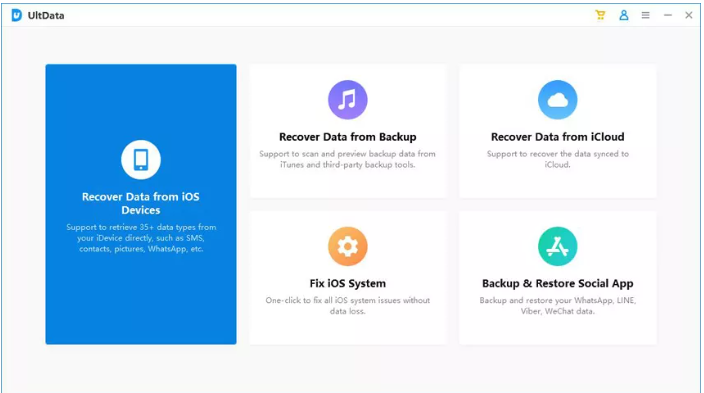
Use Tenorshare Ultdata to Recover Your Data Precisely
Tenorshare UltData is a powerful iOS data recovery software that can help you recover deleted or lost data from your iPhone, iPad, or iPod touch without the need for any backup. It supports more than 35 file types, including messages, contacts, photos, videos, WhatsApp, Kik, Viber, WeChat, notes, reminders, Safari history, and more.
Also, the best part is that you can use Tenorshare iPhone Data Recovery for the latest iOS 17/iPadOS 17 and iPhone 14 models.
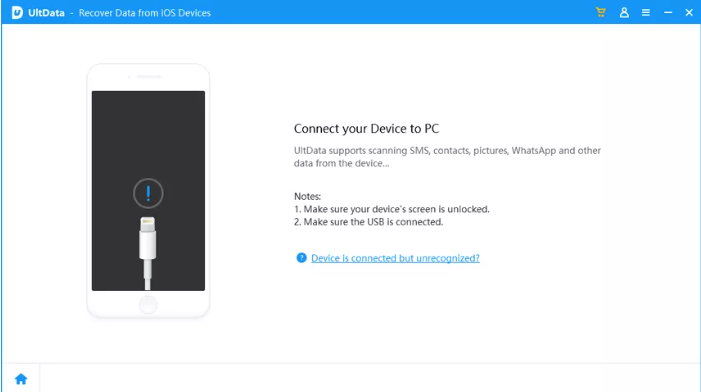
- Download and install Tenorshare UltData on your computer.
- Launch UltData and connect your iOS device to the computer with a USB cable. UltData will detect your device automatically and show you the main interface.
- Choose the recovery mode you want to use: Recover Data from iOS Device, Recover Data from iTunes Backup File, or Recover Data from iCloud Backup File.
- Select the file types you want to recover and click on the Start Scan button. UltData will scan your device or backup for the deleted or existing data.
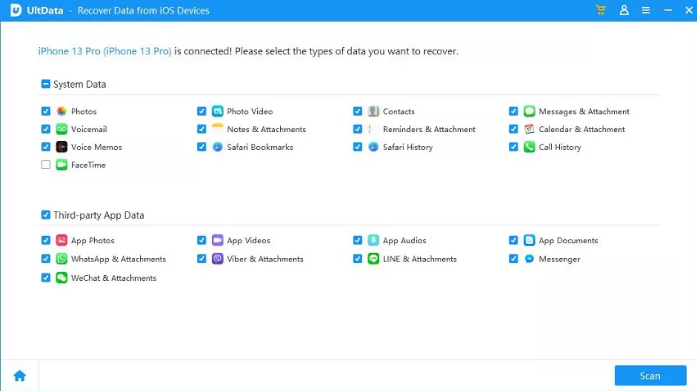
- After the scan is completed, you can preview and select the data you want to recover.
- Click on the Recover button and choose a location to save the recovered data on your computer.
The Takeaway!
So there you have it! This guide contained everything related to how to fix iPhone attempting data recovery after update. The optimal solution for handling attempting data recovery iPhone problem is none other than ReiBoot. Also, if you end up in a data recovery, you can use UltData data recovery tools to recover all your data with ease!
Hot FAQs
What Does Attempting Data Recovery Mean on iPhone?
This means that your iPhone is trying to restore your data and settings after an update or restore process. It usually happens when your iPhone encounters some errors or interruptions during the update or restore process, such as low battery, unstable connection, corrupted firmware, etc.
How Long Does Data Recovery Take?
Generally speaking, data recovery can take anywhere from a few minutes to several hours or even days. However, if you use Tenorshare UltData to recover a few deleted photos from your iPhone, it may take only a few minutes.